

Everything I learned about tabling at live events
In March of 2020, I set a goal for myself: to table at one live event before the end of that year. I bet you can guess how that turned out. 🦠👀 The silver lining is that I didn’t end up re-branding and launching my business until October of 2020, which gave me time to reflect on and create the business you see today!
Thankfully, 2021 afforded me opportunities that 2020 did not and I was able to vend at THREE in-person events this year. All of them were small, local 1 day pop ups, but I learned a lot and wanted to pass along the knowledge for future creative entrepreneurs who aren’t sure if they are ready to take the plunge into in-person sales.

IHIM Pop-Up at New Motion Brewery — December 2021
First off, if your business is currently online-only and you have the opportunity to participate in a live event, DO IT! I cannot recommend this enough, and unless the product you sell is extremely niche, excessively large, or subject to weather damage (i.e rain or heat), then pop up events can be a great way to expand your business.
PROS & CONS
Here are just some of the PROS of tabling at a live event:
Face-to-Face interactions with your customers
Hands-on practice of entrepreneurial skills
Networking and knowledge sharing with other local makers
Supporting other small businesses
Gathering data on what sells well in-person vs online
Now, I’d be remised if I didn’t mention a few CONS as well, but I’m hoping to address some of these barriers throughout this post, so don’t get discouraged this early on!
Costly to purchase the booth space
Travel/time can be restrictive
May require you to bring your own table/chairs
Purchasing displays can be costly
Sales and traffic to the event are not guaranteed
Time & Money
Let’s start with addressing the first two “cons”: cost and time. The price to rent a booth space will vary widely depending on the venue and event organizer. I’ve seen some booth spaces cost as little as $50 and as much as $1,000. Factors that contribute to the cost usually include: location, venue, demographic (i.e. future brides vs college students), duration of the event, table/chairs, tent/canopy, food and drinks, live entertainment etc.
What you are typically “paying for” with the cost of the booth rental, is the approximately 8’x10’ space where you can set up and sell your product for that event. Tables and chairs are not always included in this cost, so it’s important to read the fine print. Same goes for outdoor events, a canopy may not be included. More established or reputable events may cost more, as they can better predict the turn out, based on previous years.
Another factor that paralyzes a lot of sellers from transitioning to pop up events is not knowing what events are in their area, or not having the transportation or time to travel there. While I may not be able to solve that problem in it’s entirety, I hope to at least demystify some of the confusion about how to find events in your local area. Once you’ve begun tabling at a few of these events, you’ll begin to learn about others really quickly (one of the advantages of all that networking), but if you’re just starting out, it’s easy to feel out of the loop.
I recommend checking out local farmers markets, state or county fairs, local festivals, and conventions in your area. Whenever possible, I suggest attending an event first as a customer, so you can scope it out and see if it’s the kind of place your idea customer would shop. However, when this isn’t possible, try and speak with vendors from previous events to learn about what to expect.
Here are some great resources for finding local events in your area: (I will try to keep this list updated)
Another good tip for finding events is to utilize social media— follow relevant hashtags (i.e. #SanDiegoPopUps) or search Facebook for events near you. Odds are, while you might not catch an event in time to be a vendor, you can scope it out and inquire about future vending opportunities.
It’s important to keep an eye on the dates that vendor applications open up. In my experience, they can open up around 3 months prior to the event, and can stay open all the way up until the week of the event. I like to allow myself 1-2 months of prep for an event. This allows me to spread out the tasks over a reasonable amount of time (while still balancing my 9 to 5) and avoid any last minute panics. The application process is usually pretty streamlined—it’s often it’s as easy as filling out a Google form and paying an invoice to reserve the spot.
Display Yo-Self!
Now it’s time to address the other potential “con” of tabling at live events— as a solely online business, you don’t have to worry about potential customers seeing your messy workspace, however, when selling at a live event, how you display your products can be the difference between a window shopper and a sale!
I’ll start off by saying MORE ≠ BETTER. You don’t want to overcrowd your table with every single product you sell. Focus on making your displays eye-catching. This is a great opportunity to lean on your brand colors to help create a cohesive set-up and help draw customers into your booth.
Purchasing items for your booth set ups is an upfront investment cost, so if you aren’t sure if you’re going to make live events part of your long-term business plan, I would start small and focus on single-day events where tables and chairs are included.
Here are some of my top tips for table displays:
Go vertical— have elements on your table that draw a customer’s eyes upward
Label products and display prices clearly
Advertise unique selling points (i.e. handmade waterproof stickers)
Show items in use (i.e. water bottle with stickers on it)
Change up your display based on the event
Change up your display throughout the day
Offer a variety of items at varying price points
Have payment information clearly visible (i.e cards accepted, PayPal, Venmo info etc.)
Another tip— Practice your display setup at home. This helps you work out any kinks with the scale and placement of your items. Ideally, you want to do this 1-2 weeks prior to your event so you have time to run out and purchase any additional items you may need.

Here was my “Practice” run before my first pop-up event.

My FIRST event — Sunshine Handmade Market (September 2021)
Because I know some of you may be curious about where to shop for table displays, I wanted to include a few general resources as well as a few affiliate links (*) to the specific products I purchased:
General Resources:
Vista Print (Business Cards & Banner)
You can also check out your local dollar store, Daiso or thrift store for creative displays and table props.
Affiliate Links:
Again, MORE ≠ BETTER. Start small and keep it simple with your displays in the beginning. Don’t feel pressured to bring all your products to an event. Bring what you think will sell, and focus on displaying it proudly!
Prep Work
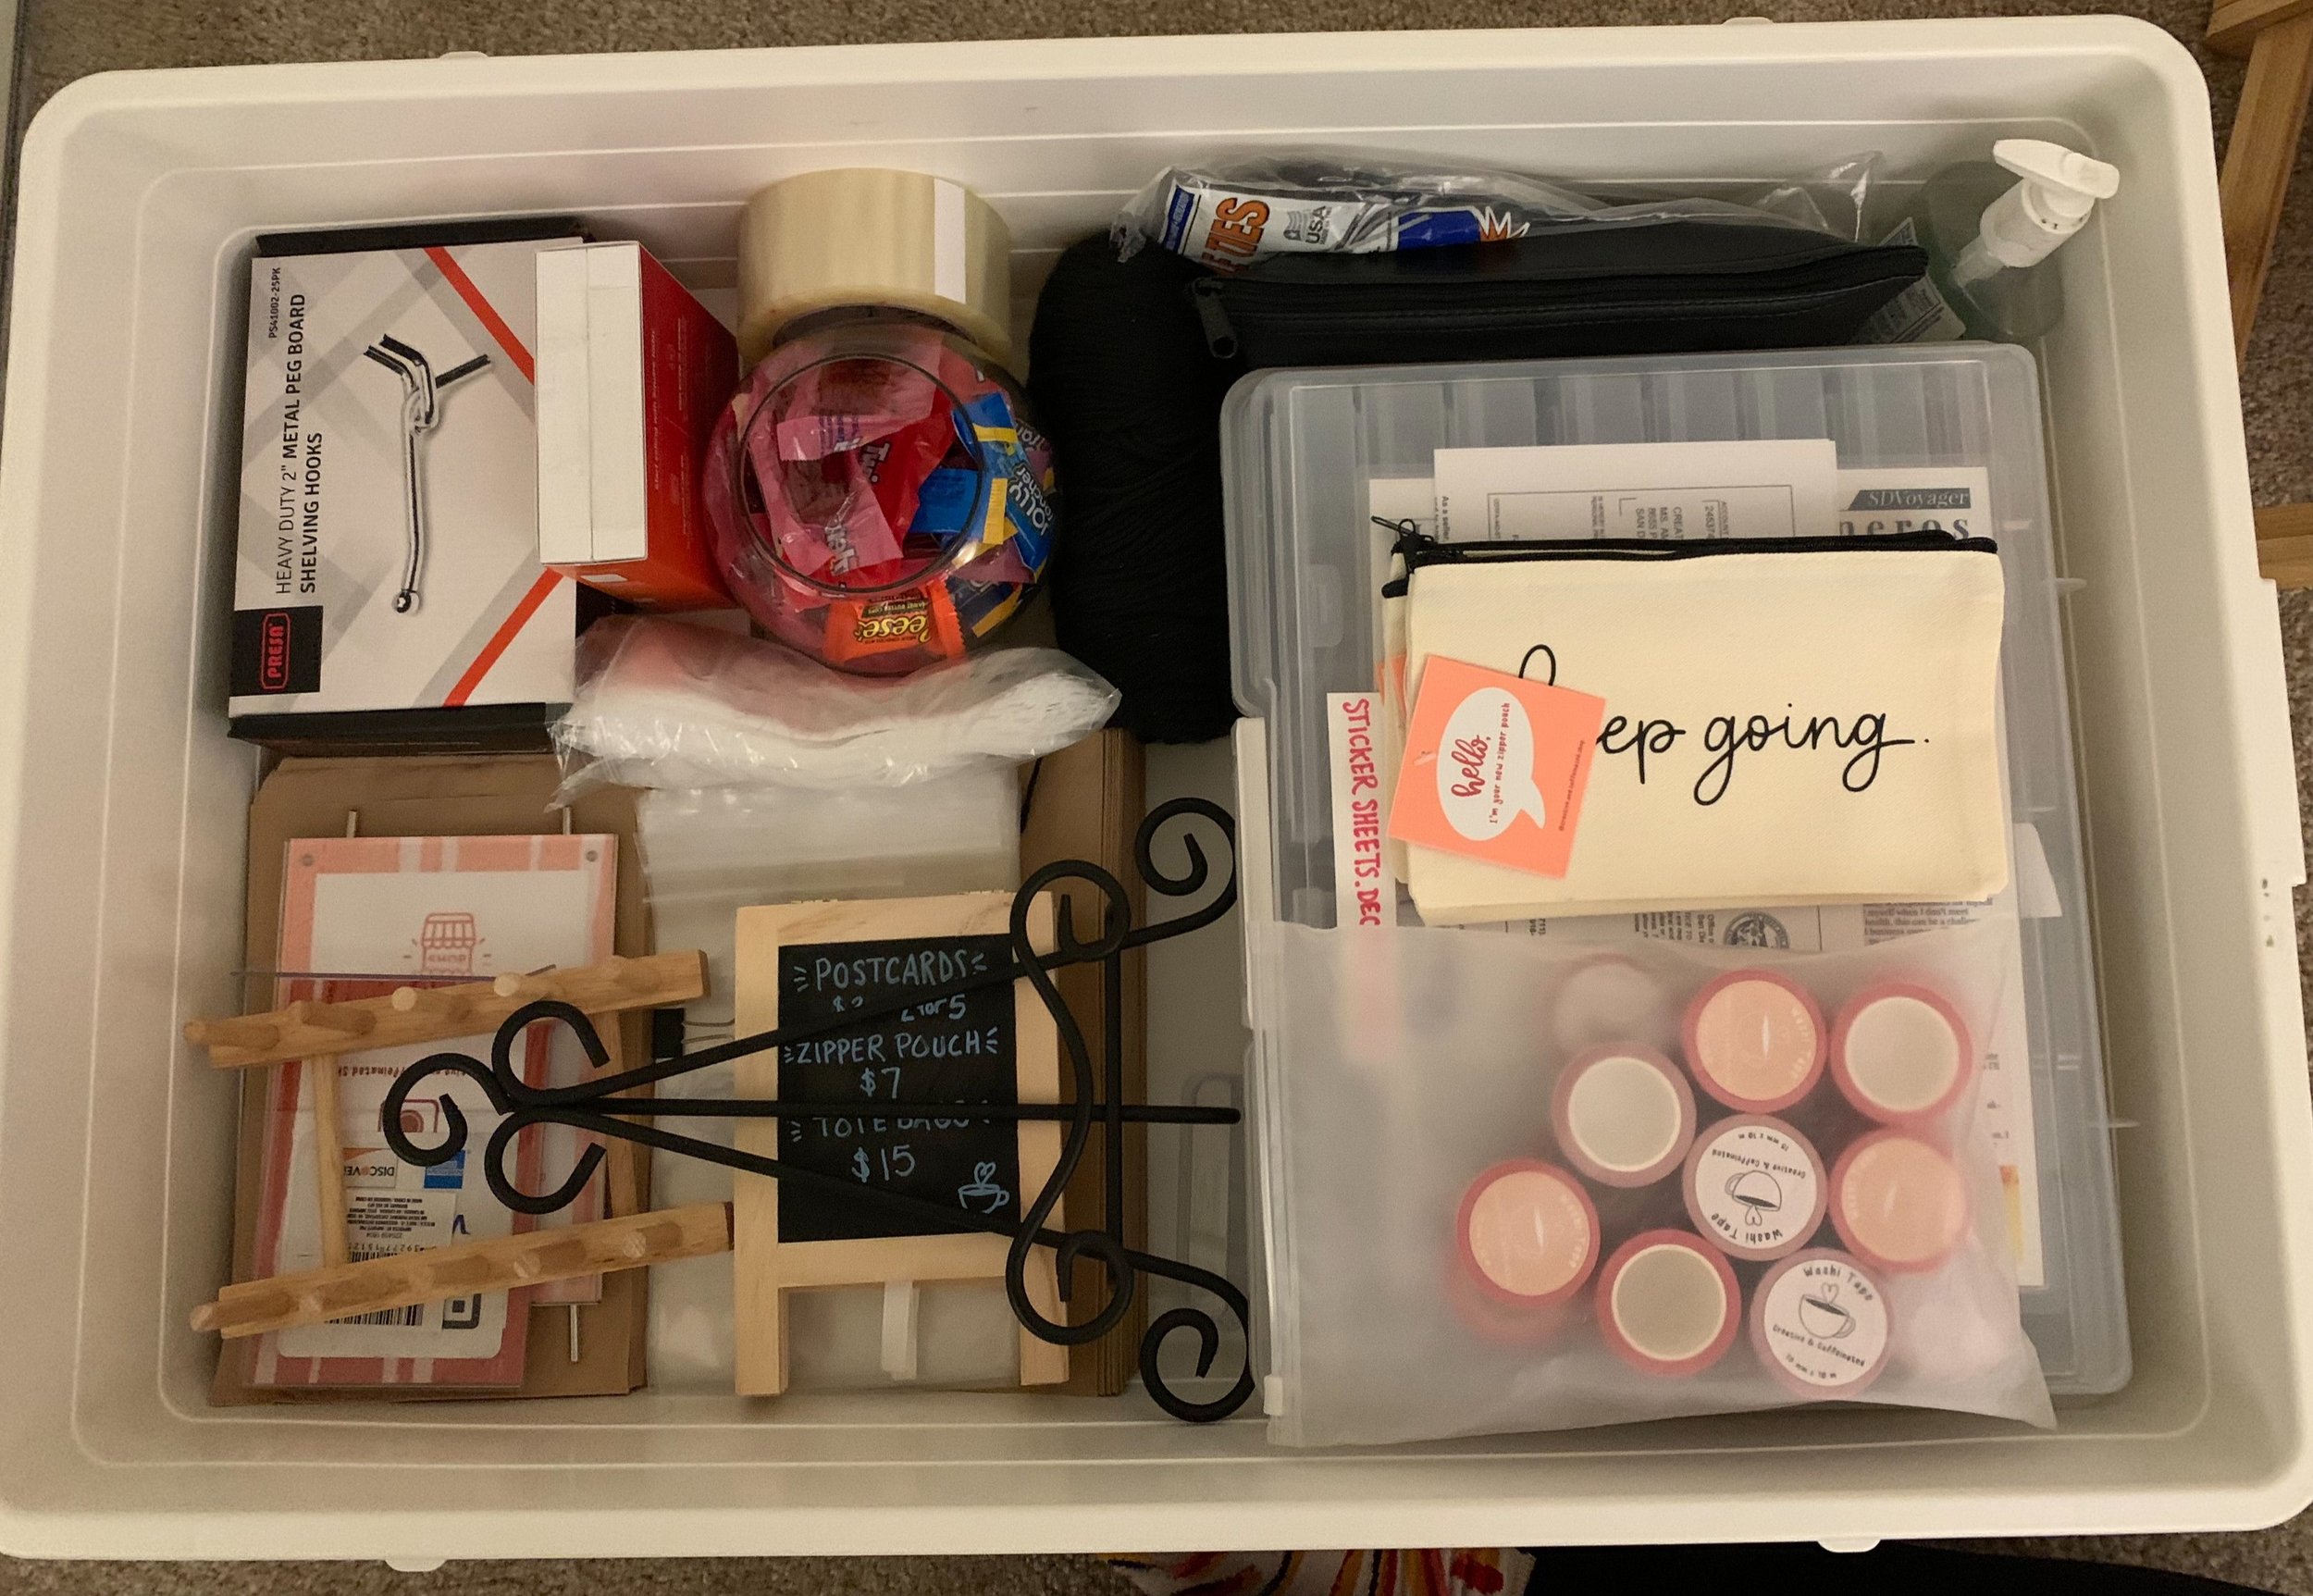
A few months ago, I did a whole series on my Instagram where I broke down everything I pack for pop-up events. The best part? It all fits in this low profile Ikea container that I can carry myself in the event that I’m flying solo.
Here is the overview:
Here are the links to all the videos I created in that series:
Some tips to remember the day before your event
Make sure all card readers are changed and charger for your phone and the device is packed
If you are accepting cash, have a “float” of small bills available so you can make change
Update stock counts for items
Print out your temporary sellers permit
Grab extra business cards, freebies and discount code flyers
Pack snacks & water
Organize your storage bin with items you need first on the top (i.e. table cloth)
Sell it!
Now I want to talk about some day-of tips that really make a difference when you’re vending in person.
First off, it helps to have a buddy, whether this is a friend or family member that you’ve volun-told to hang out with you for the day, or a member of your small business team, having someone by your side at an event makes a world of a difference. From prep, to set up, to processing payments, packing and clean up— it’s a lot of hats to juggle as one person and just because we small business owners are good at juggling, doesn’t mean we have to do it all the time. Recruit help if possible— trust me, even if it’s just so you can eat and go to the bathroom without having to worry about your table.
In the event that you are flying solo at an event, it doesn’t hurt to get to know your booth neighbors. At all of the pop-up events I’ve vended at thus far, getting to know my fellow artists and makers has been my favorite part! Make a friend, even if it’s just so you can make small-talk during the lulls of the day, it’ll be worth your while!
Remember: You are not a used car salesman. You are not there to pressure every person who walks by into buying your “one-time offer”. The soft-sell approach goes much farther than the hard-sell. I make it a point to say hi to everyone who walks within 5 feet of my booth, even if it’s just to tell them I like their shoes, or ask if they’re having a good day so far. When someone lingers for more than a few seconds, that’s when I take the time to share about any special deals I have going on, or to tell them more about a specific product they have their eyes on.
Consider having a special event freebie or discount code to offer customers that purchase something at the event. It also doesn’t hurt to have some items be “exclusive” to the event, or to offer a bundle option that isn’t available online. This helps to incentivize people to buy now instead of shop later, when they may have lost interest.

Biz Baz Club at New Motion Brewery - October 2021
It is what you make it
Lastly, I wanted to address the mental shift that is often necessary when tabling at live events. You may sell something. You may sell nothing. Odds are good that may not sell as much as you want to, or break even with your booth cost, but pop-ups are about so much more than just the sales.
If you are a new business owner, pop-up events are basically a 1 day intensive boot-camp where you get to learn new skills, practice different marketing strategies, gather data on your best selling products, and best of all, you get to put yourself out there as a business. You can’t hide behind a booth the same way you can hide behind an online shop— or at least, you shouldn’t! You become the face of your business and that gives people something to connect with.
If you don’t have a good experience at one pop-up, don’t get discouraged, write it off as a learning opportunity and move on to the next one.
Don’t worry, I’ve got your back
For the TLDR, or for those of you who want a condensed, checklist version of this blogpost, I got your back! Here is the Pop-Up checklist, FREE for you to download!
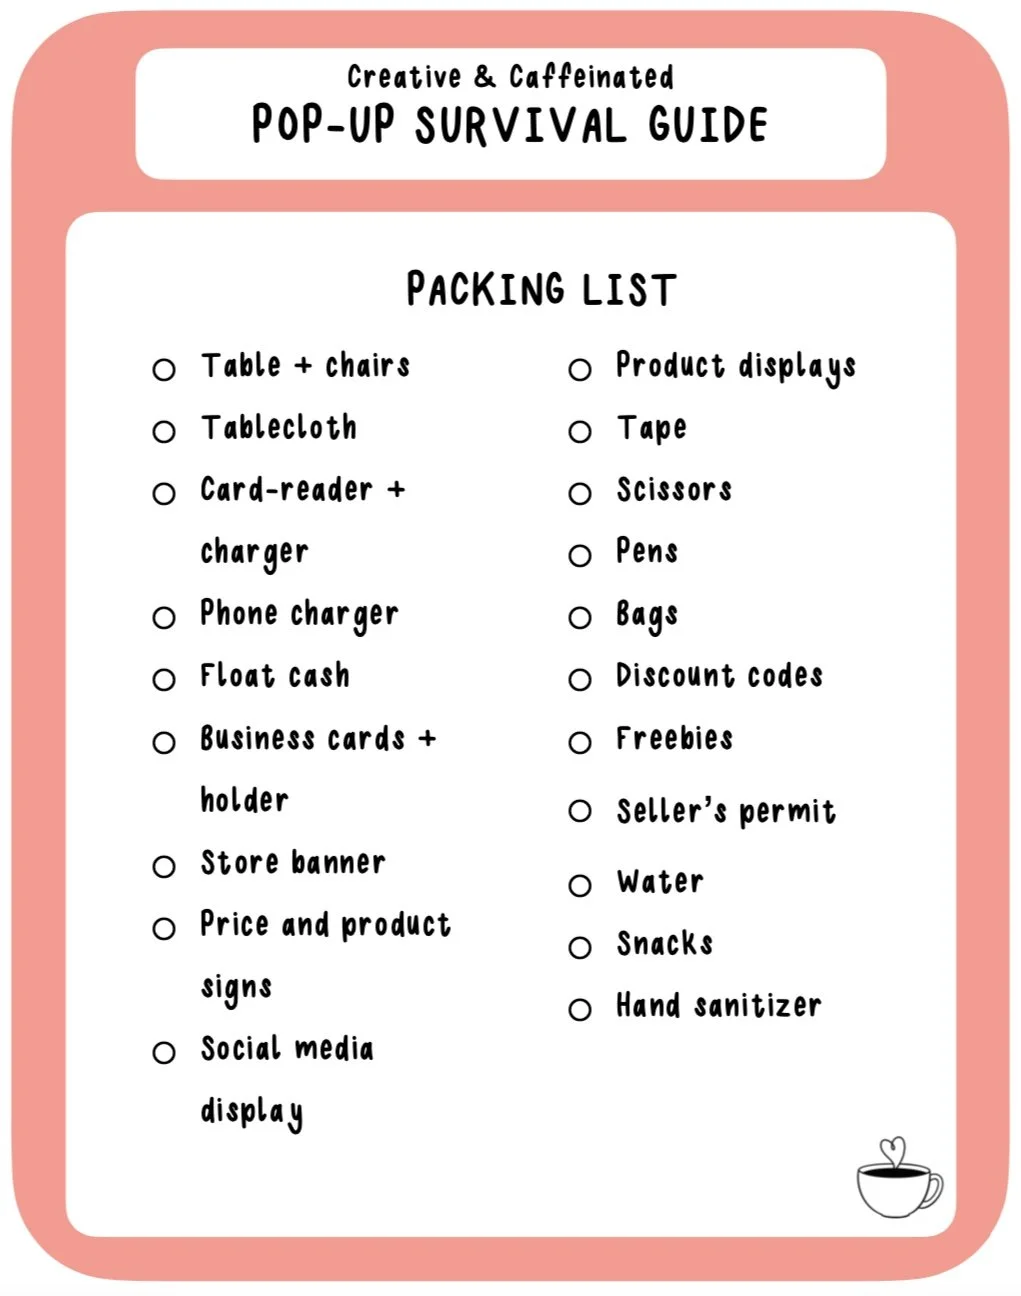
1 of 6 helpful brainstorming checklists in this guide